Introduction
Even if you live in different geographic zones where the cellar holes are not present, do not be easily discouraged or disheartened by the title of my article! Of course, other areas require different search methods and detecting techniques due to their geographic and historic specifics, nevertheless, some of the practical approaches to site searching described in this article may be effectively applied to those areas as well!
Also, there are as many different metal detecting styles as there are many metaldetectorists in this hobby. Nevertheless, sharing my search techniques with you might give you new ideas on how to improve your own detecting style.

I'm Standing Next To
Woodstock Historical Society Plaque, 1994
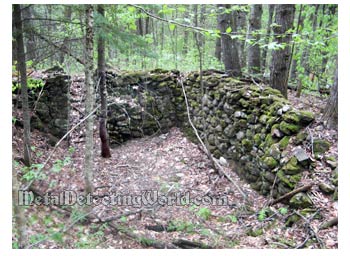
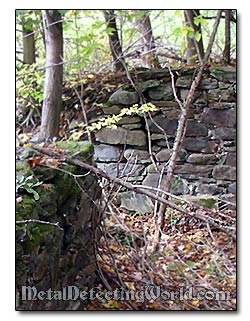
As most of the abandoned homestead sites in the US North-East are situated in the remote wooded areas and can be easily located through the detailed 19th century maps such as Beer's Maps, they have been searched many times over many years. Nowadays, it is hard to find a "virgin" site, therefore, you will be dealing with the hunted out sites most of the time.
But sometimes, depending on your level of experience, abilities and level of research, you might come across a desirable "virgin" site. That is why I included both cases - searching the "virgin" and "hunted out" sites, into this article full of metal detecting tips.
When you arrive at the hunt site of a former settlement or just a single homestead for the first time, act as a detective armed with a metal detector and try to quickly gather the following pieces of useful information:
- 1) cellar's "age" - depending on a year of construction, the cellar holes can be roughly divided into three "age groups": a) pre-1800s cellar holes (highly desirable and sought), b) cellars built during the first half of the 19th century, and c) cellars built during the second half of the 19th century (read details on page 3 of this article);
- 2) site's "topography" - former locations of main dwellings, stone walls, flower and vegetable gardens, and secondary structures - utility sheds, well(s), pathways, chicken coops, cowshed, pigpens, outhouses, cesspits, etc.;
- 3) site's status - "virgin" or "searched out"
- 4) site's current level of junk content - high or low levels of old iron junk and/or modern trash;
- 5) site's natural level of mineral content (magnetic mineralization) - neutral, low-mineralized or high-mineralized ground, and whether or not the "sporadic magnetic mineralization" (hearths, pottery, brick, slag, coke, etc.) is interspersed with soil.
Before going deeply into the subject of metal detecting around cellar holes, I would like to explain a few things about your metal detector's Sensitivity and Discrimination settings, and the search coils to select.
SENSITIVITY Settings
Always remember that too much Sensitivity can do more harm than good. Most detectorists have been in pursuit of "getting more depth penetration" out of their metal detectors to "catch" deeply buried coins and artifacts. To meet their unrealistic objective, many enthusiasts crank up the Sensitivity to the maximum, but only a few get the desirable results. Please refer to my article "Quieter Operation of a Metal Detector vs. Detecting More Deep Coins" (it is included in the "Search Programs for Minelab FBS Metal Detectors" section) for details on myths about Sensitivity, Discrimination and Detection Depth.
Only a few metal detectors on the market today such as the Full Brand Spectrum (FBS) multi-frequency ground reject detectors - Minelab Explorers, Minelab Safari, Minelab E-Trac, and Minelab CTX 3030, and the High-Reactivity/High-Frequency detectors - XP GoldMaxx Power and XP Deus, are able to separate the effects of external interference from weak target signals (you may want to visit my page for XP Deus search programs which is going to be published soon).
Other single-frequency (low or medium) detectors and dual-frequency detectors get jammed when their sensitivity levels are too high because the interferences from the high sensitivity circuit noise, partially rejected targets and ground mineral effects are also intensified. It could be compared to the effect of driving your car in the fog with high beams on - the "Fog and Headlights" Effect:
Just as the millions of tiny water droplets suspended in the air shorten the distance the headlight's high beam can travel through the fog, millions of oxidized iron particles in the "negative" non-conductive ground matrix "cloud" the weak electromagnetic field induced off a deeply buried coin when the Sensitivity setting is high.
Turning down the sensitivity level enables you to hear weak responses to deep targets as the audio distraction caused by the above-mentioned interferences is reduced.
Instead of trying to determine the ground conditions and trash density at the hunt site which you visit for the first time, start your search using maximum Sensitivity setting and then gradually reduce it to the level of detector's stability. This simple technique will save you time and allow you to easily fine-tune your detector for maximum performance under current conditions.