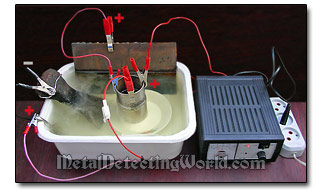
PART I: How To Remove Rust From Iron Relics and Artifacts by Electrolysis, page1
The Most Detailed and Illustrated Tutorial On The Web!

All information presented in this section is primarily for the inland and fresh underwater relic hunters; however, those detectorists who sometimes dig up unusual relics, and everybody else who wants to restore and preserve valuable iron artifacts, can greatly benefit from reading this tutorial as well. Please feel free to submit your own practical tips and methods that could help others!
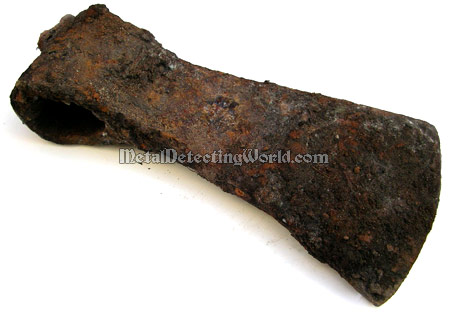
A dug and heavily rusted axe head, circa the early 17th century, was used for this tutorial among other iron artifacts used in the process of rust removal with electrolysis. Being well over four hundred years old and having spent much of its time buried in the ground, this axe head had developed a thick layer of flaky rust.

 This tutorial describes an activity that involves SOME risk of harming yourself, other persons, animals, and property. So please pay attention to all details, use common sense, be smart about what you are doing, proceed with caution, and stay safe so you can enjoy your iron restoration projects!
TABLE of Contents:
1. Introduction to Electrolytic Rust Removal
- What is Rust? (page 2)
- What is Electrolysis? (page 2)
- Does Electrolysis Cause Pitting? (page 2)
- What is Direct Current? (page 3)
- What is Electrolyte? (page 3)
- What is an Electrode? (page 3)
- Advantages of Electrolysis Method over Other Methods of Rust Removal (page 4)
2. Making a Simple Electrolysis Machine
- DC Power Supply (page 8)
- Anodes - Sacrificial Electrodes (page 9)
- Additional Anode Connectors (page 10)
- Cathode - Negative Electrode (page 13)
- Non-Conductive Container for Electrolysis (page 14)
- Making an Electrolyte (page 15)
- Choosing a Proper Place for Setup (p.15)
3. Preparations and Assembly of Electrolytic Setup
- Tools, Accessories and Iron Treating Products (page 16)
- Preparing an Artifact for Electrolytic Derusting (page 17)
- Placing Electrodes in Electrolyte Properly (page 19)
- "Line of Sight" (page 20)
- Time Required for Complete Derusting (p.20)
- Placing Artifacts in Electrolyte Properly (page 21)
- Setting Up Correct Polarity (page 21)
4. The Process of Electrolysis
- Starting the Process (page 22)
- Controlling Voltage and Current (page 23)
- Ammeter Readings (page 23)
- Hydrogen Embrittlement (page 23)
- Wasting Energy through Heat (page 23)
- Messy Bath - Crud, Froth and Precipitants (page 24)
- Adding Water to Make Up for Its Disintegration and Evaporation (page 24)
- Cleaning Rust off Anodes (page 24)
- Treating Relic's First Derusted Half (p. 25)
- Derusting Second Half of Artifact (p. 26)
5. After-Electrolysis Cleaning of Derusted Iron Relics
- Rinsing and Wire-Brushing (page 27)
- What is Black Coating and How to Clean It Off?(page 27)
6. Conservation and Preservation of Iron Artifacts
- Displacing Water from Iron Surface (page 29)
- Effective Sealants and Their Applications (page 29)
- Using Rust Inhibitor, Proper Storage of Artifacts (page 30)
7. Multiple-Relic Electrolysis
- Making a Multiple-Part Hanger/Cathode (page 31)
- Soldering (page 32)
- Attaching and Suspending Iron Parts (page 34)
- Starting the Process (page 35)
- Combining Small- and Medium-Sized Relics in Multiple-Part Electrolysis (page 36)
- Multiple-Part Electrolysis of Medium-Sized Artifacts (page 36)
8. Electrolysis of Iron Cannonballs and Shells
9. "Before and After" Photos of Iron Relics
10. Safety Precautions
- Dangerous Levels of Voltage and Current (page 40)
- Avoid Being Electrocuted (page 40)
- Avoid Short Circuiting (page 40)
- Protect Your Eyes and Skin (page 40)
- Avoid Toxic Gas Danger (page 40)
- Prevent Accumulation of Explosive Gases (p. 40)
- Keep an Electrolysis Setup Undisturbed (p. 40)
- Crud and Precipitated Rust Disposal (page 41)
- Prevent Overheating of Power Supply (page 41)