Rust Removal with Electrolysis - A Detailed Illustrated Tutorial, page 23
4. The Process: Messy Electrolytic Bath, Adding Water and Cleaning Anodes
3) Gross Electrolytic Bath - Crud, Froth and Precipitants
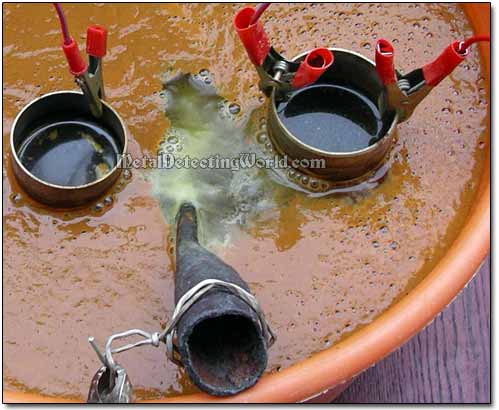
As soon as you turn on the electrolysis machine and start the process, the electro-chemical reaction begins changing the color of the electrolytic solution - the electrolyte gradually turns yellowish-brown. The more time into the process, the dirtier the electrolytic bath becomes, and after 2-3 hours, it turns into a nasty looking "soup" - a mass of bubbling crud and froth is floating on the surface, or suspended in the solution, as well as equally gross precipitant is accumulating at the bottom of the container.
Messy Electrolysis Bath with Crud and Froth on Surface
If you do not use 1) STAINLESS STEEL anodes that dissolve toxic Hexavalent Chromium into the electrolyte (see details in the "Anode - Positive Electrode" section on page 9), or 2) prepare electrolyte with TABLE SALT producing toxic Chlorine gas, both released in vapor and trapped in the electrolyte during the process (see details on page 15), there is nothing hazardous for your health in the electrolytic bath.
In fact, the "soup" contains only the products of electrochemical reactions, and what you put into the container:
1) electrolyte itself (Sodium Bicarbonate or Sodium Carbonate + water);
2) pollutants that are in the original water (if it is not de-ionized or distilled) - Hydroxyls, Carbonates, Sodium, Iron, Calcium and Chlorine;
3) contaminants - tars and gunk, that had been on the iron object to be de-rusted;
4) Iron compounds - Iron Oxides and Ferric Carbonates, that either stick to the anodes or precipitate on the bottom of the container;
5) Hydrogen and Oxygen gases - the products of the redox reaction, small amounts of which may be trapped in the electrolyte.
As both the pollutants and contaminants will contribute their ions - Calcium Carbonate, Sodium Chloride, Sodium Carbonate and who knows what else to the electrolyte, it is extremely important to use distilled or de-ionized water, and to clean any salts off the iron object prior to de-rusting (see details in the "Preparing Artifact for De-Rusting" on page 17). Sodium Carbonate will stick to the cathode (the artifact to be de-rusted) and will be hard to remove (see more details in the "What is the Black Coating and ..." section on page 27).
Out of all chemical reagents and compounds, only two - Hydrogen and Oxygen, will evaporate during the process. Anything else will remain in the electrolytic solution as soluble salts or as solids, which will either remain suspended in the solution (crud), float on the surface (froth, murk, crud and gunk), attach to the anode (tufts of rust changing surfaces), remain on the surface of the de-rusted iron object (sodium carbonate), or fall to the bottom (rust and gunk).
Rust Precipitated on Bottom
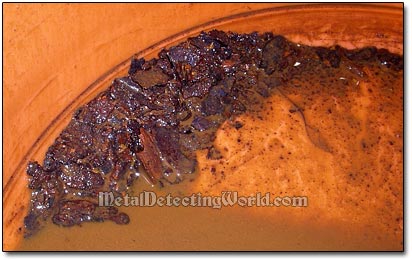
NOTE: DO NOT let the bath get overloaded with the crud and precipitated rust. If the rust settles onto the iron part being de-rusted, it will be a pain in one place to remove it. Do not leave your artifact in the crud-loaded solution for too long, and change the electrolyte frequently!
All the nasty stuff in the bath is mildly basic - ok to dispose; however, you may not want to dispose the precipitates (rust and insoluble compounds) down the drain (see more details in the "Crud and Precipitated Rust Disposal" section on page 41).
4) Adding Water to Make Up for Its Disintegration and Evaporation
The higher the electric current, the faster the water is broke down into its component gasses - Oxygen and Hydrogen; thus, the level of solution goes down faster as well. Depending on the volume of the container and the number of iron objects being de-rusted, water needs to be added to the container every 2-3 hours to compensate for its electrolytic disintegration, evaporation, and caustic vapors.
NOTE: The amount of soda in electrolyte remains THE SAME during the entire session of de-rusting. ONLY water should be added to bring the solution level back up, and prevent the electrolyte from getting stronger. Highly concentrated electrolyte may cause problems associated with the excessive current.
One should keep an eye on the electrolyte's level and add ONLY water when the "waterline" recedes one inch or more.
Decreased Level of Electrolytic Solution Manifests Itself on Container's Walls
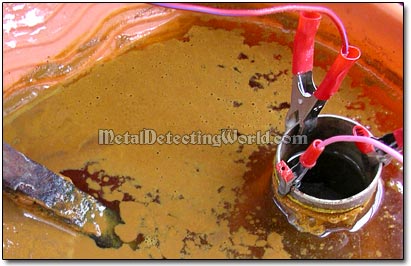
 The greater the volume of the electrolyte, the slower the speed of receding of the electrolytic solution level. So use the largest container possible for your electrolytic setup.
5) Cleaning Rust off Anodes (Sacrificial Electrodes)
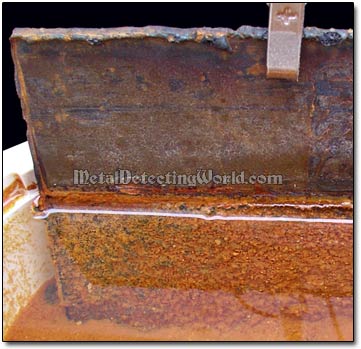
Because electrolytic de-rusting removes rust from a cathode (iron artifact), and electro-plates this same rust onto an anode, the working (submerged) area of the anode gradually becomes more resistant to electric current. After this area is completely coated with the non-conductive rust, an electrical barrier is created. This barrier nearly stops the electric current's flow through the electrolyte.
Transferred Rust Has Accumulated on Submerged Area of Anode
As soon as you notice a significant decrease of amps on the ammeter's scale (the ampere reading is below 2 amps), or you do not see as many oxygen and hydrogen bubbles coming off as before, turn off the power supply, disconnect the anode from it, and take the dirty anode out of the bath for cleaning.
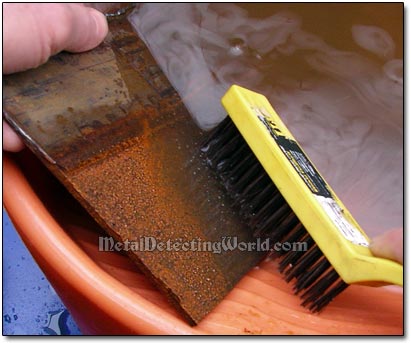
A metal wire brush is the best tool for cleaning the accumulated rust off the anode fast - it takes only a few seconds! And the anode is back in business! At this point, I also remove the artifact out of the bath, wire-brush as much loosened rust off the artifact as possible, clean the container, change the electrolyte, put everything back together in the container, and my electrolytic setup is ready to run effectively for another session.
Wire Brushing Accumulated Rust Off Anode
