How To Clean Coins and Jewelry with Electrolysis - An Illustrated Tutorial, page 12
2. How To Make a Simple Electrolysis Device for Cleaning Coins
2) COIN ELECTROLYSIS MACHINE of "PIPE" TYPE
An electrolysis machine of this type is my favorite because it is easier to set up and more efficient than the electrolysis machine of the Classic type. The Pipe Type electrolytic coin cleaner has a different power supply and anode.
• DC Power Supply
My goal in designing the "Pipe" type electrolysis machine was to make it faster and more powerful. This would enable me to clean numerous tarnished and slightly corroded dug clad and other coins faster than usual. One of the ways to increase the speed and efficiency of the cleaning process is to utilize a power source that could supply higher Voltage/Amperage to the electrolytic cell.
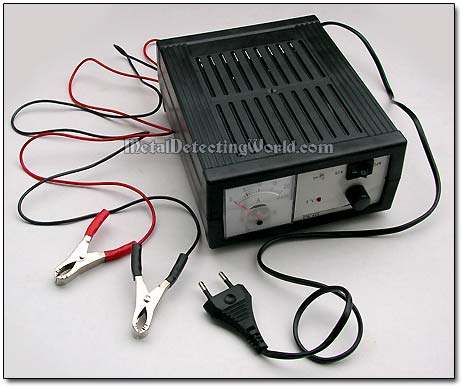
I decided to use a car battery charger, the same charger which I use for electrolytic derusting of iron relics, and surprisingly it did a great cleaning job on the clad coins. If you would like to learn more about using car battery chargers for electrolysis, please visit page 8 of my "Electrolytic Rust Removal" tutorial.
This Car Battery Charger Is Used for Electrolytic Cleaning of Clad Coins

Specifications for My Car Battery Charger:
• Charging voltage output: 0-15V in 12V mode, 0-30V in 24V mode
• Charging current: 0.4-20A in 12V mode, 0.4-15A in 24V mode
• Fitted with ammeter, the amount of current is set up by a knob: 0 to 20A
• Fitted with voltage selector switch 12V/24V
• Fitted with cooling fan and protective circuit against overheating
• Designed for indoor use in temperature range from -10°C to +40°C
• Incorporates polarity and short-circuit protection
This car battery charger incorporates an Ammeter which allows for determining an optimal level of concentration of the electrolytic solution (see details on next page). The ammeter is also a very useful device for checking amperage readings that reflect the ongoing cleaning action. The amperage can be controlled by a knob, so a high current density can be selected to increase the hydrogen evolvement for quicker or slower removal of the hardest encrustation off the coin.
Even though this car battery charger has the battery clamps attached, I recommend to use the disposable alligator clips at the terminals to connect to the cathode and anode inside the electrolytic cell; thus, preventing the charger's clamps from any corrosive effects of hot vapor evolving above the electrolytic cell during electrolysis.
It is best to use the charger that does NOT have a timer, relay or charging rate device so that it can run continuously for the entire electrolytic coin cleaning session. Also, make sure you do not purchase a car battery charger that will not start generating current in the electrolyte unless you use a battery along with it.
• Anode - Sacrificial Positive Electrode
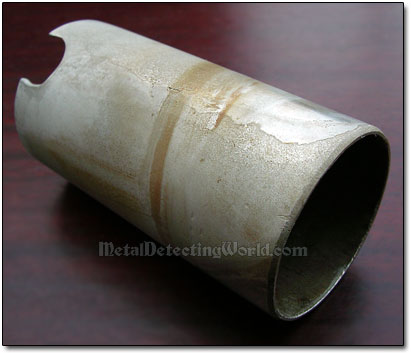
Another way to increase the speed and efficiency of the electrolytic coin cleaning process is to use an anode that surrounds the coin by 360°. I found a piece of a stainless steel pipe that could last long and best serve the purpose: it fits into the glass jar, and its diameter is larger than a diameter of an average large coin. As the "line of sight" is all around the coin, entire coin's surface gets uniformly cleaned within a short period of time. So this setup does not have any of the "Classic" type's drawbacks.
Positive Electrode - "Sacrificial" Anode, for "Pipe" Electrolytic Coin Cleaner

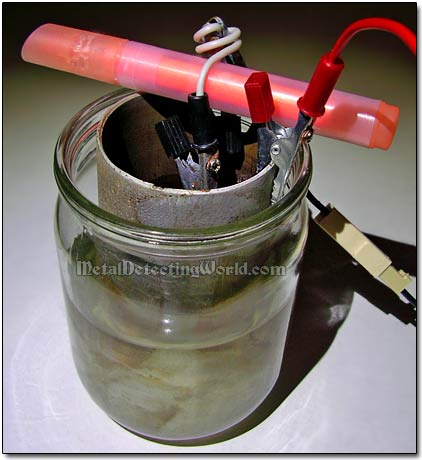
When assembled, the electrolysis setup of the "Pipe" type looks like this:
A Simpler and More Efficient Electrolysis Setup for Cleaning Coins

An orange marker is placed across the jar's lip to provide proper suspension of the coin into the electrolyte. This can be also done to improve the coin's position inside the electrolytic cell of the "Classic" setup. And the AC/DC adapter from the "Classic" setup can be used to supply lower electric current to the "Pipe" setup if the high voltage/amperage is not desired while keeping the device's efficiency high.